
Let’s learn embroidery!
So you're thinking about starting embroidery but you’re not sure what supplies you need or how to get started. We’re here to help you make sense of a few things.

Embroidery is a simple craft, really, and there isn't a whole lot you need to get started. We’ll talk about a number of beginner embroidery tips and supplies here, but know that if you have a piece of fabric, thread and a needle, you can create an embroidery piece! We believe in you.
If you have a piece of fabric, thread and a needle, you can create an embroidery piece!
In this post, we’ll walk through the basic embroidery supplies, different methods to transfer a pattern, threading a needle, and starting and stopping your embroidery without using knots. We also give a quick tutorial on how to finish your embroidery hoop as a frame.
Let’s get started!
Embroidery supplies
First up, embroidery supplies! Let's talk about some basic supplies for embroidery and the different options that are available. We'll cover how to use your embroidery supplies in the "Preparing to Stitch" section.
Embroidery hoop
There are a few different types of embroidery hoops, but the most common styles include plastic, wood, and metal. Almost all embroidery hoops will have some sort of screw closure at the top. Embroidery hoops come in a variety of sizes and shapes. The most common shape and size is a round hoop sizing anywhere from 4 to 12-inches.
An embroidery hoop has two parts: the inner hoop, and the outer hoop. The outer hoop is the one with the screw closure on it. These two parts are intended to fit together to hold your fabric taught while stitching.

Embroidery floss
Embroidery floss, also known as 6-stranded embroidery floss, is different from regular sewing thread because it separates easily into multiple strands, which is intentional. The purpose of this separation is to allow the creator to choose how many strands they want in their design, giving a unique texture to the piece.
More strands = Thicker lines
You may choose to use the same amount of strands or different counts throughout the embroidery pattern. My favorite amount of floss strands to work with is 2 or 3, depending on the pattern. I typically use the same number of strands throughout the whole embroidered piece, but will mix it up if I'm looking to get more depth of perspective in a piece.

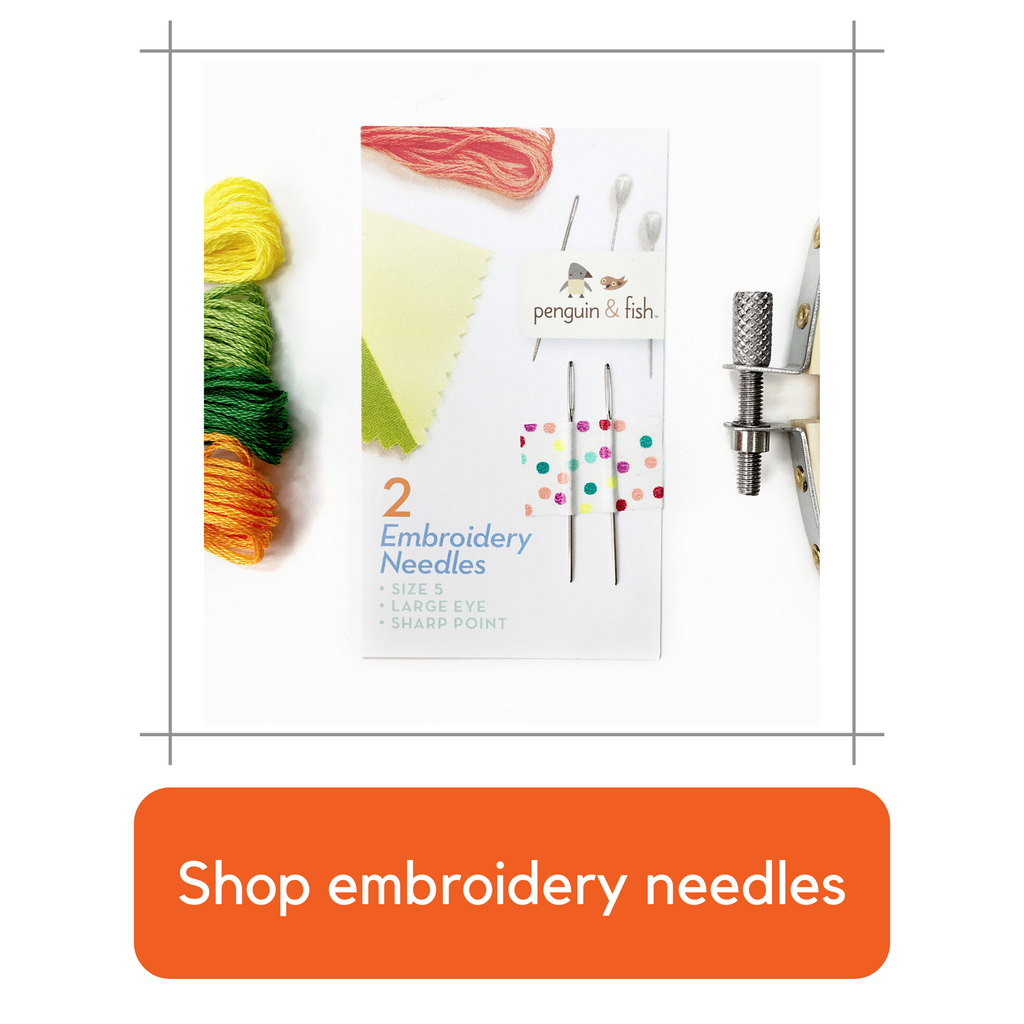
Embroidery needle
An embroidery needle is essential for hand embroidery. The sharp point of the needle helps to pierce holes through the fabric, making stitching possible.
Embroidery needles come in a variety of sizes that include different lengths, thicknesses, and eye size. When choosing a needle, you want to be sure to pick one that has an eye large enough to fit the number of strands you want. For example, if you typically stitch with all 6 strands, you'll want to make sure the eye of the needle is larger.

Needle sizes also vary based on the producer, but will typically be sized based on length or thickness of the needle. In most cases, the eye of the needle is proportional to these other measurements.
Want our suggestion? The Penguin & Fish embroidery needles are our favorite for beginners, and not just because we sell them. They are praised by our customers for their large eyes, making it easy to thread the needle.
"These are the most premium embroidery needles. They are the perfect sharpness, they have the perfect threading eye! They are the best!" - Gretchen
Fabric for embroidery
Embroidery projects can be stitched on many different types of fabric, but there are a few that work really well for beginners due to their looser weave (how tightly the strands are woven together to make the fabric).
Our favorite is cotton muslin, a lighter-weight cotton fabric with a larger weave, that's easy to stitch through. This is the type of fabric we use in all of our embroidery kits for beginners. Cotton muslin typically comes bleached or unbleached.

Quilters cotton fabric is another type of fabric that is often used in embroidery. This is the type of fabric you'll find at most craft stores that comes in a variety of different fun colors and designs. This fabric works well for embroidery. The only difference is that the tighter weave of this fabric may make it a bit more difficult to stitch through and keep your work even.

Choosing and transferring an embroidery pattern
If you’re just getting started with embroidery, it can help to choose a pattern that has simple lines with plenty of spacing. These types of patterns will help you learn the basic embroidery stitches before diving into more complicated techniques.

When it comes to transferring your embroidery pattern onto fabric, there are a number of ways to do this. We’ll cover what a few of the basic methods here and some tips on how to do each one.
Iron-on transfer
An iron-on transfer is an embroidery pattern that has been printed with ink that allows the pattern to transfer when heat is applied from an iron. These patterns will be printed in reverse (backwards) so that once they are ironed they will appear the correct way.
Pro Tip: Iron-on ink can transfer through your fabric so place a paper towel or piece of paper underneath your fabric to prevent transferring to your ironing board.
To use an iron-on transfer, first warm up your fabric by pressing it with an iron. This is an important step! Do not use steam with an iron-on transfer. Now, place the pattern face down onto the fabric, centering the image. Carefully place the iron on top of the paper and count to 5.


Pre-printed fabric
The easiest way to transfer an embroidery pattern, is to use a fabric that already has the pattern pre-printed onto it! Shameless plug here, but Penguin & Fish boxed embroidery kits come with pre-printed fabric, which makes them a great option for beginners.

Tracing
If you have a PDF or printed embroidery pattern, a super easy way to get it onto your fabric is by tracing. You can use a pencil or a special Water Erasable Marker.
To trace your pattern, first place the pattern face up on your work surface, then lay the fabric over the top. You may want to tape the pattern and the fabric down to keep them from shifting. Then, trace your pattern onto the fabric. If it’s tough to see your pattern through the fabric, try doing this against a window during the day, or using a light table, if available.

Sulky Stick’n Stitch
Finally, the best kept secret in embroidery transferring is Sulky Stick’n Stitch - an embroidery stabilizer that you can print on from your home computer, stick to your fabric, and stitch right there.

Once you've printed your pattern, simply peel off the back, stick the sticker to your fabric and start stitching! When you're done, soak your embroidered piece in warm water to dissolve the Stick'n Stitch. It can help to gently agitate the piece while it's soaking to remove all the Stick'n Stitch.


For more details on transferring a PDF pattern, check out this blog post:

Preparing to stitch
Now that we have our basic supplies gathered and have transferred our pattern, it’s time to get ready to stitch. In this section we'll discuss how to prepare your fabric, separate your embroidery floss, and thread your needle to make your first stitches!
Putting the fabric in the hoop
To put your fabric in the hoop, place the inner hoop underneath the fabric. Then, centering the design, place the outer hoop on top of the fabric, gently pushing down. Tighten the screw slightly (don't go too tight yet).

Once your pattern is where you'd like it, gently pull on the sides of the fabric, making it evenly taught in the hoop. We don’t want to stretch the fabric, but just make sure it is secure. When you’re ready, tighten the screw the rest of the way.
Cutting & Separating floss
We suggesting cutting your embroidery floss approximately 18-24 inches (46-61cm). You may be tempted to use a longer piece of floss so that you don’t have to switch threads as often, but trust me, a shorter piece will keep you from lots of frustration. Not only does a longer piece of floss knot more easily, but the floss can also lose its integrity being pulled through the fabric more frequently.
Now, seperating the embroidery floss strands can be headache. Luckily, we have a super fun trick that prevents headaches, and big knots:
First, tap the end of the floss a couple of times until you see the threads start to separate. Now, holding the floss between your pointer finger and thumb, carefully use your other hand to pinch out just one strand. Pull on this strand slowly until it is removed from the other strands.

The rest of the threads will start to bunch up, but don’t panic. Once your single thread is removed, the rest of the floss will release back to a strand.
Repeat this process until you have the number of strands you need, then put the strands back together, running your hand down the threads to re-incorporate them. It’s okay if they aren’t perfectly twisted together! The strands will hold together just fine and give a nice textured look to your finished piece. Although it may seem silly to take the strands apart and put them back together, this is the best method I have found to avoid knots or needing a third hand.
Pro Tip: This trick will only work when you take one strand out at a time. If you try more than one strand, you’ll get knots.
Threading the needle
Now that we have our fabric ready in our hoop and separated our floss strands, it's time to thread our needle and start stitching! One of my favorite ways of doing this is what I call the pinch method. We’ll also talk about how to use a needle threader if you have one available.
Pinch method
First make sure the end of your floss has a nice clean cut. Then, pinch the end of the floss between your pointer finger and thumb. Slowly un-pinch your fingers until you start to see the tips of your threads. As soon as you see the threads, place the eye of the needle above the strands. Continue un-pinching and press the threads into the eye of the needle.


Needle threader
To use a needle threader, place the wire loop of the threader through the eye of your needle. Then, thread your embroidery floss through this loop. Pull the threader back out from the eye of the needle, and this will thread the needle!


The first stitches
It's time to make the first stitches on your embroidery pattern! Now, you could just tie a knot at the end of your floss and start stitching, but there are a few reasons why I prefer to stitch without knots.

First, the knot can pull through to the front of your fabric while stitching and there isn't really a way to fix this. Second, having knots on the back of your piece can catch your thread while you’re stitching, leaving big ‘ole loops on the back that you didn’t see and can’t go back to fix. And finally, if you’re embroidering something like a tea towel where the back will be visible, knots can look a bit clunky. In the image above as well as below, you can see that the back of this embroidery project is quite clean, without huge jumps or big knots.

In this section we'll discuss starting your first stitches and talk about the two different methods of stitching.
Starting with an away knot
My favorite way to start an embroidery piece without using any knots on the back is to start with an away knot, or a waste knot. This is a knot that we will eventually cut away, but it will help reserve a length of thread to be woven in later.

To make an away knot, tie a knot at the end of the embroidery floss. Find a spot approximately 4-inches away from where you will start stitching, and away from the stitches, and bring the needle down through the FRONT of the fabric to the back.
When you are out of floss, finish by weaving the needle and floss through the backs of a few stitches. Go back and forth through these same stitches 3 times total to secure the floss in place. See 'Changing floss' below for more details.
Now, go back to the away knot and trim off the knot, leaving a loose end of floss on the back of the fabric. Thread this onto your needle then weave it through the backs of a few stitches three times, like you did at the end of your floss.
Where do I start stitching on the pattern?
When you start stitching on an embroidery pattern, you really can start wherever you want! I personally like to stitch the main part of the pattern first as this is typically the thing that excites me most about the pattern. With that said, here are a couple of tips to keep in mind when stitching an embroidery pattern:
Tip #1: Try mapping out your stitch path before you start stitching. This can help you find the most efficient route to preserve floss and avoid big jumps across the back, which can cause threads to catch or be seen from the front..

Tip #2: Stitch the pieces of the design that sit further back first. Doing this will allow for the thread from closer items to sit on top, perceiving them to be closer. For example, in the image below, the plant was stitched first and the pot second to give perspective that the plant is behind the front of the pot.

Different embroidery stitches
There are so many different embroidery stitches! You may want to play with multiple types of stitches in your embroidery piece, and that's awesome. You also can use the same stitch throughout your entire piece, and end up with something just as cute. A few basic embroidery stitches that can help you get started include the back stitch, French knot stitch, and lazy daisy stitch.
Learn how to do these stitches and more in our Embroidery Stitch Library! Click the image below to be taken to the Library.

Stabbing Method vs Sewing Method
There are two different ways to do an embroidery stitch - the stabbing method or the sewing method. When I learned how to stitch, I learned the stabbing method, but many others learned with the sewing method. Let’s break down what each one means.
Stabbing method: This is when you bring the needle all the way down through the fabric and then all the way back up. This is two full motions. This method works great for precise stitch placement.

Sewing method: This is when you complete a stitch in one fluid motion. The needle goes into the fabric and back up in one grab. This method works better on more decorative stitches.

You may choose to stick with one method over the other, or switch back and forth depending on the stitch. Either way, do what feels most comfortable for you!
Changing floss
Inevitably, you'll run out of embroidery floss while you're stitching and need to get more. Here's a quick run down on how we change our floss without without tying a knot, what to do with the away knot, and how to start the next strand of embroidery floss.
Weaving in the ends without a knot.
When there is about 4-inches of floss left on your needle, finish your current stitch, ending on the back of the fabric. Don’t want to wait too long or there won’t be enough floss to finish.
On the back side of your piece, weave the needle and floss through the backs of a few stitches. Go back and forth through these same stitches 3 times total to secure the floss in place. Trim away the excess floss.
 Taking care of the away knot
Once you finish your strand of thread, go back and take care of the away not. First, trim off the knot, leaving a loose end of floss on the back of the fabric. Thread this onto your needle then weave it through the backs of a few stitches three times, like you did above.
Finishing Tip: If the floss is too short to weave the needle in a third time, try using the eye of the needle to weave instead of the point.
Starting the next strand of floss
Since you already have stitches on the back of your embroidery piece, there is no need to use an away knot again, unless you are a starting in a new section without stitches. To start a new thread without a knot, simply thread the next floss onto your needle and weave it back and forth 3 times through the stitches that are close to your starting point. Voila!
Finishing your embroidery in the hoop
Once you've finished your embroidery pattern, give yourself a high-five because you did it! Then, if you'd like to frame your work of art, which you should totally do because it is worth showing off, here’s a quick tutorial on how to finish an embroidery hoop as a frame!
Step 1: Re-center the finished embroidery in the hoop and pull the fabric taut, then tighten the hoop closure.

Step 2: Using a scissors, cut off the excess fabric, leaving a 1-inch edge of fabric around the hoop.

Step 3: Now, cut a piece of floss that’s long enough to go all the way around the hoop plus 12-inches and thread this onto your needle. Using the running stitch, embroider large stitches around the excess fabric, about ½-inch from the fabric edge. Leave a 6-inch tail of floss at the start.

Step 4: Continue stitching until you’ve gone all the way around the hoop and return back to where you started. Now, pull both ends of the floss to gather the fabric in towards the back of the hoops (this part is magic!). Once the floss is tight all the way around, tie a knot and trim the excess floss.

You did it!
Way to go! You completed your first embroidery project! If it felt a bit clunky, that's totally normal. It will get easier and smoother the more you practice. Even after years of doing embroidery work, I'm still learning new things. Embroidery is a craft that is about the journey, not necessarily the destination. Don't worry about your work being 100% perfect - spoiler alert, it never will be. Shoot for 80% good and having a good time, and you'll create something cute every time.
------------------------------
Don't want to deal with transferring, choosing colors, or deciding on what stitches to use? Try starting with one of our an all-inclusive embroidery kits, designed with beginners in mind.

------------------------------

FREE Stitching Raccoon Sampler
If you're ready to put your new embroidery knowledge into action and learn some basic embroidery stitches, check out our FREE Stitching Raccoon Sampler! Refer back to your finished sampler for future projects or hang it in your craft space for a spark of joy.
How it works: Sign up on the form below and then add the free pattern to your cart. Go through the checkout process (you will not have to enter payment unless you add additional products). A link to the pattern will be emailed to you after checkout. This process will store the pattern in your Digital Library on penguinandfish.com as well.

3 comments
Sue
I have the same question as Jane Taylor, left on 4/19/24 – where stitches overlap, which do you stitch first? Satin stitch will cover overlapping stitch drawn under the satin stitched area.
Jane Taylor
Thank you for a very informative article. If you’re doing a piece that has things overlapping, in this case a hanging basket with I’ve hanging over it, which bit to I do first? If I do the basket, satin stitch, I cover the leaves up but if I do the leaves first then the basket doesn’t look right as the line is broken. Hope that makes sense!
Veronica Earley
Thank you so much for this very helpful email. I am going to try “no knot.” I just love Penguin & Fish. Having so much fun with my embroidery kits. Your embroidery items are first class.
Awesome!
Veronica Earley